
Prepare print-ready artwork.
Set up your document correctly, export a production PDF, then check it carefully before uploading.
Document size, bleed & safe area
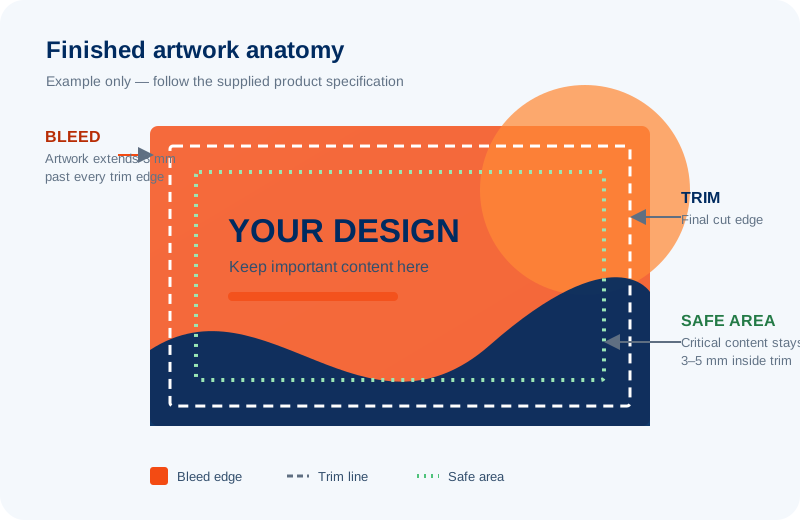
- Page size: build the document at the ordered finished (trim) size—do not place a smaller design on a larger page.
- Bleed: unless the product specification says otherwise, extend backgrounds and edge-to-edge images at least 3 mm beyond every trim edge.
- Safe area: keep text, logos, borders and other critical content at least 3 mm inside the trim; 5 mm is safer for small-format work.
- Folds and binding: keep critical content clear of fold, crease, spine, perforation and binding zones shown on the template.
- Scale: supply artwork at 100% size where practical. If large-format artwork is supplied at scale, state the scale clearly.
Colour, images & black
- Colour space: prepare process artwork in CMYK using the profile specified for the job. Unconverted RGB colours may shift on press.
- Spot colours: retain approved Pantone or named spot colours when specifically ordered. Name special separations consistently.
- Resolution: use continuous-tone images at about 300 ppi at final placed size. Use higher resolution for 1-bit line art; avoid upscaling low-resolution images.
- Fine black text: use 100% K for small black type and fine rules. Use a press-approved rich black only for large solid areas.
- Ink coverage: avoid excessive total ink. Follow the supplied CMYK profile or ask us for the permitted total area coverage.
Dielines, folds & special finishes
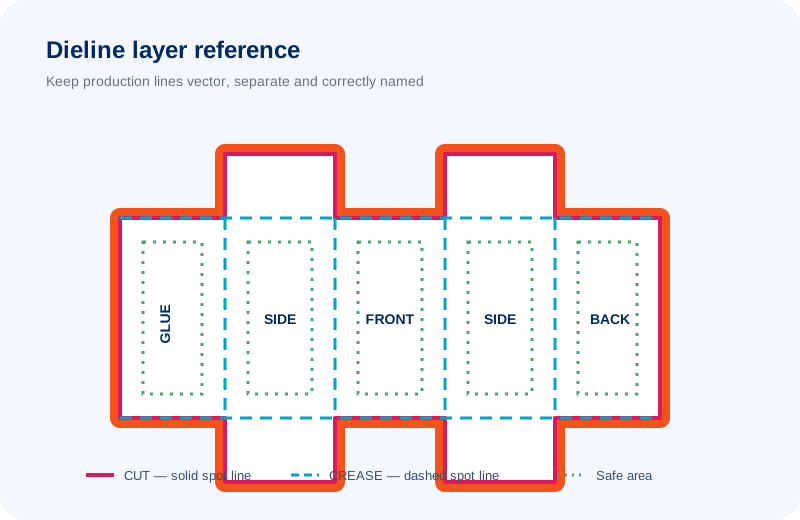
- Use the supplied dieline without resizing or redrawing it. Keep it on a separate, clearly named top layer.
- Create cut, crease, perforation, varnish, foil, emboss and white-ink plates as separate named spot colours exactly as instructed.
- Keep dielines as vector strokes, set them to overprint where instructed, and never merge or rasterise them into the design.
- Extend artwork through the bleed beyond cut edges, while keeping important content inside the safe area.
- Do not place unrequested notes, dimensions, colour bars or registration marks inside the printable artwork.
No dieline? Ask us for the correct template before designing packaging, labels or any custom-cut product.
Recommended PDF export
Why PDF/X-4? It supports live transparency, colour management and modern print workflows. A printer may request PDF/X-1a for an older flattened workflow; do not flatten transparency unless instructed.
Preflight before you upload
Open the exported PDF—not only the source document—and inspect every page at high zoom.
- Finished page size, orientation and page count match the order
- Bleed is present and backgrounds reach beyond the trim
- Important content is inside the safe area
- Images are sharp and links are not missing
- Fonts are embedded and text has not reflowed
- CMYK, spot colours, overprint and transparency preview correctly
- Dieline and finishing separations use the required names
- Spelling, phone numbers, URLs, barcodes and QR codes are verified
Upload after payment
- Configure the product and complete checkout.
- Open My orders & artwork and select the paid order.
- Choose the correct file for every required artwork slot.
- Perform one last filename and preview check, then click Upload artwork.
Filled slots cannot be replaced. Review the final PDF carefully before uploading.
My orders & artworkFile acceptance
Maximum size: 100 MiB per file
Configured extensions: .pdf, .jpg, .jpeg, .png, .tif, .tiff, .ai, .cdr, .psd, .eps, .zip
The server validates the file type and artwork slot. Successful upload does not by itself confirm that artwork is print-ready.
Ask us to check your setup